
T4 Thermostat Installation Manual: A Comprehensive Guide
Welcome! This manual provides detailed instructions for installing your new T4 thermostat, enabling energy savings and smart home integration.
CNET highlights the T4’s potential to reduce costs and connect with other smart devices, simplifying home climate control for optimal comfort.
Understanding the T4 Thermostat
The T4 thermostat is a sophisticated device designed to modernize your home’s heating and cooling system. It goes beyond traditional thermostats by offering smart features like remote control, energy usage monitoring, and integration with other smart home appliances – including dehumidifiers, as noted by CNET.
This thermostat learns your preferences and automatically adjusts temperatures to maximize comfort and minimize energy consumption. Its intuitive interface allows for easy programming and customization. The T4 isn’t just about convenience; it’s about revolutionizing how you manage your home climate.
Key benefits include potential cost savings, enhanced control over your indoor environment, and a seamless connection to a broader smart home ecosystem. Understanding these capabilities is the first step towards a more comfortable and efficient home.
What’s Included in the Box
Upon opening your T4 Thermostat package, please verify that all components are present. The box should contain the following items: (1) T4 Thermostat Display Unit – the main control interface for your system. (2) T4 Thermostat Base – this mounts to the wall and connects to your HVAC wiring. (3) Mounting Plate – used for secure installation on various wall types.
(4) Screws and Wall Anchors – ensuring a stable and lasting installation. (5) Wire Labels – crucial for accurately identifying your existing wiring during removal. (6) Quick Start Guide – a simplified overview to get you started quickly. (7) This comprehensive Installation Manual – providing detailed step-by-step instructions.
Carefully inspect each item for any damage. If anything is missing or appears defective, please contact customer support immediately before proceeding with the installation. Proper preparation ensures a smooth and successful setup, as highlighted by expert guides at CNET.
Safety Precautions Before Installation
WARNING: Electrical shock hazard! Before beginning any installation work, absolutely disconnect power to your HVAC system at the circuit breaker or fuse box. Failure to do so could result in serious injury or death. This is the most critical safety step.
Caution: If you are uncomfortable working with electrical wiring, we strongly recommend hiring a qualified HVAC technician. Improper wiring can damage your system or create a fire hazard. Always double-check wiring connections before restoring power.
Important: Wear appropriate safety glasses to protect your eyes from dust and debris. Keep children and pets away from the work area. CNET experts emphasize careful preparation and adherence to safety guidelines for a successful smart thermostat installation. Do not attempt installation during wet or humid conditions.
Preparation for Installation
Get Ready! Before you start, identify your wiring, confirm HVAC compatibility, and gather the necessary tools for a smooth and efficient T4 installation process.
Identifying Your Existing Wiring
Crucial First Step: Carefully examine the wires connected to your current thermostat. Before disconnecting anything, take clear, detailed photos of the wiring configuration – this will be an invaluable reference point during the T4 installation.
Common wire colors include Red (Power), White (Heat), Yellow (Cooling), Green (Fan), and Blue (Common). However, color coding isn’t universal, so relying solely on color can be misleading.
Labeling is Key: Use small pieces of tape and a pen to label each wire according to its terminal designation on your old thermostat (e.g., R, W, Y, G, C). This meticulous labeling prevents confusion and ensures correct connections to the T4 base.
If you encounter a wire connected to a terminal not listed above, consult a qualified HVAC technician. Incorrect wiring can damage your HVAC system or the T4 thermostat.
Compatibility Check: HVAC System Requirements
Ensuring a Smooth Installation: The T4 thermostat is designed to work with most standard 24V heating and cooling systems. However, verifying compatibility before installation is essential to avoid issues.
System Types: The T4 supports conventional systems (furnace and air conditioner), heat pumps, and dual-fuel systems. It is not compatible with line voltage systems (110V or 220V) or millivolt systems.
C-Wire Requirement: A “C-wire” (Common wire) is often required for powering smart thermostats like the T4. If your existing thermostat doesn’t have a C-wire, you may need to install one or use a C-wire adapter (sold separately).
Heat Pump Considerations: For heat pump systems, confirm your wiring configuration matches the T4’s supported setup. Incorrect wiring can lead to improper heating or cooling operation. Consult a professional if unsure.
Tools Needed for Installation
Gathering Your Supplies: A successful T4 thermostat installation requires a few essential tools. Having these readily available will streamline the process and ensure a secure, reliable connection.
Essential Tools: You will need a Phillips head screwdriver (various sizes may be helpful), a flathead screwdriver, wire strippers, and a small level. A voltage tester is highly recommended for safety verification before handling wires.
Optional, but Useful: A digital multimeter can assist in troubleshooting wiring issues. A pencil for marking wires before disconnection is also beneficial. Consider a wire labeling kit for easy identification during reconnection.
Safety First: Always prioritize safety! Ensure the HVAC system is completely powered off at the breaker before beginning any wiring work. Proper tools and precautions are key to a safe installation;
Installation Steps
Begin the process! Carefully follow these steps to install your T4 thermostat, ensuring a secure connection and optimal performance for enhanced home comfort and control.
Step 1: Powering Down Your HVAC System

Crucially, before commencing any wiring or installation work, completely disconnect power to your heating, ventilation, and air conditioning (HVAC) system. This is a paramount safety precaution to prevent electrical shock and potential damage to both yourself and the equipment.
Locate your HVAC system’s breaker in the main electrical panel. The breaker is typically labeled “Furnace,” “HVAC,” or something similar. Flip the breaker to the “OFF” position. Double-check that the system has no power by attempting to turn on your heating or cooling – nothing should happen.
For added safety, it’s recommended to also switch off the power to the entire HVAC unit at the unit itself, if accessible. This provides a redundant layer of protection. Confirm power is off with a non-contact voltage tester before proceeding to the next step. Ignoring this step could lead to serious injury.
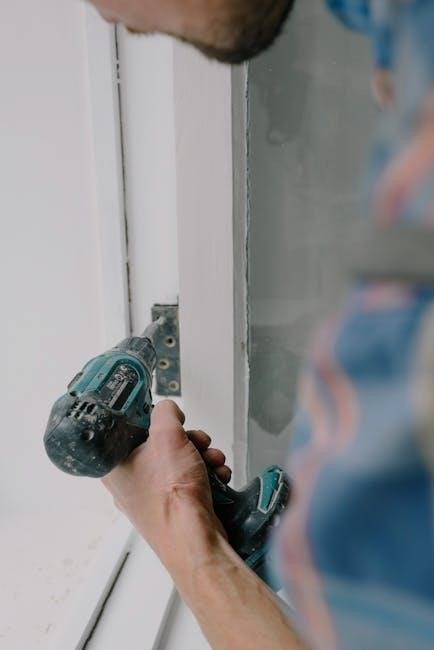
Step 2: Removing Your Old Thermostat
Carefully remove the cover of your existing thermostat. This usually involves gently prying it off or releasing a clip. Once the cover is removed, you’ll see the wiring connected to the terminals on the backplate.
Before disconnecting any wires, take a clear photograph of the existing wiring configuration. This photo will be an invaluable reference when connecting the wires to your new T4 thermostat. Labeling the wires with small pieces of tape can also be extremely helpful, noting the terminal letter each wire is connected to.
Loosen the screws holding the wires in place and gently disconnect each wire one at a time. Avoid letting the wires fall back into the wall. Once all wires are disconnected, remove the old thermostat baseplate from the wall.
Step 3: Connecting the Wires to the T4 Thermostat Base
Using the photograph and labels you created, connect the wires to the corresponding terminals on the T4 thermostat baseplate. Ensure each wire is securely inserted into the correct terminal and tightened with the provided screws.
Double-check your connections against the wiring diagram included with your T4 thermostat and the photo of your old thermostat’s wiring. Incorrect wiring can damage your HVAC system or the thermostat itself.
Gently tug on each wire to confirm it is firmly secured. If a wire feels loose, re-insert it and tighten the screw again. Pay close attention to the wire colors and their corresponding terminal designations (e.g., R, W, G, Y, C).
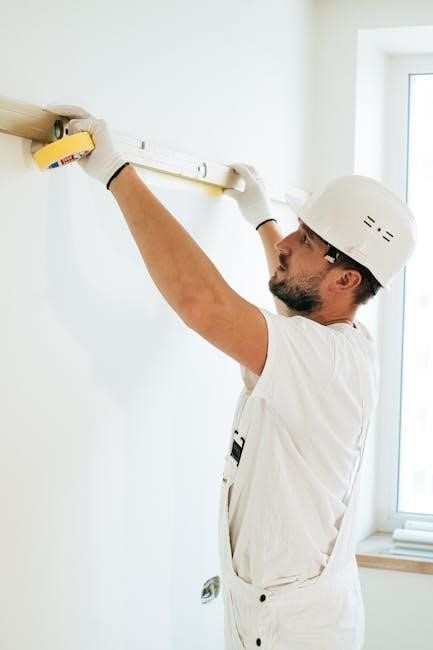
Step 4: Mounting the T4 Thermostat Base
With the wires securely connected, carefully position the T4 thermostat baseplate against the wall where your old thermostat was mounted. Use the included level to ensure the baseplate is perfectly horizontal.
Mark the screw holes on the wall using a pencil. Then, using the appropriate drill bit for your wall type, drill pilot holes at the marked locations.
Insert the provided wall anchors into the pilot holes, if necessary. This is especially important for drywall installations to provide a secure hold. Align the baseplate with the holes and secure it to the wall using the provided screws.
Ensure the baseplate is firmly attached and does not wobble. A secure mounting is crucial for the proper functioning and appearance of your T4 thermostat.
Step 5: Attaching the T4 Thermostat Display
Now that the baseplate is securely mounted, gently align the T4 thermostat display with the base. You should feel a satisfying click as the display snaps into place, indicating a secure connection.
Ensure the display is flush with the baseplate and sits firmly without any gaps. A proper fit is essential for both aesthetic appeal and reliable operation.
Carefully inspect the connection from multiple angles to confirm it’s fully seated. Avoid forcing the display; if it doesn’t align easily, double-check the baseplate’s mounting and wire connections.
Once attached, the display should be stable and responsive to touch. This confirms the electrical connection is established, preparing the thermostat for power-up and configuration.
Post-Installation & Configuration
Congratulations! Now, power on your T4 and follow the on-screen prompts for initial setup, Wi-Fi connection, and personalized scheduling preferences.
Step 6: Powering On and Initial Setup
Restoring Power: After securely attaching the T4 thermostat display, restore power to your HVAC system at the breaker. The thermostat should automatically power on, displaying the welcome screen.
Language Selection: The first prompt will ask you to select your preferred language. Use the touchscreen arrows to navigate and tap to confirm your choice.
Date and Time: Next, accurately set the current date and time. This is crucial for scheduling and ensuring proper operation. The T4 will likely attempt to sync automatically, but manual adjustment is possible.
HVAC System Type: The thermostat will now ask you to identify your HVAC system type (e.g., forced air, heat pump, radiant). Selecting the correct type is vital for optimal performance. If unsure, consult your HVAC system documentation or a qualified technician.
Location Services: Enabling location services allows the T4 to access local weather data, potentially enhancing energy efficiency and providing more accurate temperature readings.
Step 7: Connecting to Wi-Fi
Accessing Network Settings: From the thermostat’s main menu, navigate to the “Settings” icon, then select “Wi-Fi.” The T4 will begin scanning for available wireless networks in your area.
Selecting Your Network: A list of detected networks will appear. Choose your home Wi-Fi network from the list. Ensure your network is 2.4 GHz compatible, as some thermostats don’t support 5 GHz.
Entering Password: You’ll be prompted to enter your Wi-Fi password. Use the on-screen keyboard to carefully input the password, paying attention to capitalization and special characters.
Connection Confirmation: Once the password is entered, the T4 will attempt to connect to your network. A successful connection will be indicated by a Wi-Fi symbol appearing on the display.
Registration & Updates: After connecting, you may be prompted to register your thermostat and download any available software updates for enhanced functionality and security.
Step 8: Programming Your T4 Thermostat
Accessing the Schedule: From the main screen, select the “Schedule” icon to begin programming your heating and cooling preferences. The T4 allows for customized schedules based on your daily routine.

Creating Time Periods: Define different time periods (e.g., Wake, Leave, Return, Sleep) and assign specific temperatures for each period. This optimizes energy usage based on occupancy.
Weekday/Weekend Settings: Configure separate schedules for weekdays and weekends to accommodate varying routines. You can copy settings from one day to another for convenience.
Smart Features: Explore the T4’s smart features, such as geofencing, which automatically adjusts the temperature based on your location. This maximizes savings when you’re away.
Hold Function: Utilize the “Hold” function to temporarily override the programmed schedule for a specific duration, providing immediate comfort adjustments when needed;
Step 9: Testing the Heating and Cooling Functions
Heating Test: Set the thermostat to “Heat” mode and raise the temperature several degrees above the current room temperature. Verify that the heating system activates and warm air is distributed. Observe the system for any unusual noises or malfunctions.
Cooling Test: Switch to “Cool” mode and lower the temperature below the current room temperature. Confirm that the cooling system engages and cool air is circulated. Again, listen for any abnormal sounds.
Fan Operation: Test the fan settings (“Auto” and “On”) to ensure proper airflow. In “Auto” mode, the fan should only run during heating or cooling cycles. In “On” mode, it should run continuously.
Temperature Accuracy: Compare the thermostat’s temperature reading with a reliable thermometer. If there’s a significant discrepancy, calibrate the thermostat according to the manual’s instructions.
System Response: Observe how quickly the system responds to temperature changes. A properly functioning system should reach the set temperature efficiently.

Troubleshooting Common Issues
Facing problems? This section addresses frequent wiring, connectivity, and display errors, offering solutions to ensure your T4 thermostat operates flawlessly and efficiently.
Addressing Wiring Problems
Incorrect wiring is a common issue. First, double-check all wire connections against your HVAC system’s wiring diagram and the T4 thermostat’s wiring guide. Ensure each wire is securely fastened to the correct terminal on the base plate.
If the thermostat doesn’t power on, verify the ‘C’ wire (common wire) is correctly connected. A missing or loose ‘C’ wire is often the culprit. If you don’t have a ‘C’ wire, you may need to install one or use a C-wire adapter (sold separately).
For heating or cooling not functioning, confirm the corresponding wires (W for heat, Y for cool) are properly connected. A swapped wire can cause the system to operate incorrectly. Caution: Always power down the HVAC system before inspecting or adjusting wiring. If unsure, consult a qualified HVAC technician.
Resolving Connectivity Issues
Difficulty connecting to Wi-Fi is frequent. Ensure your home Wi-Fi network is functioning correctly and that you have the correct password. The T4 thermostat supports 2.4 GHz networks; 5 GHz networks are not currently compatible.
If the thermostat fails to connect, try moving the thermostat closer to your Wi-Fi router during the initial setup. Interference from other devices can also cause connection problems; temporarily disable Bluetooth on nearby devices.
Check your router settings to confirm the thermostat isn’t being blocked by a firewall or MAC address filtering. Restarting both the thermostat and your router can often resolve temporary connectivity glitches. CNET emphasizes the importance of a stable connection for full smart home functionality. If problems persist, consult your internet service provider.
Dealing with Display Errors
Display errors indicate potential issues. A blank screen usually means the thermostat isn’t receiving power; double-check wiring and breaker status. Error codes displayed on the screen require specific attention – consult the full error code list in the appendix of this manual.
If the display is flickering or distorted, try resetting the thermostat by briefly removing and reattaching the display unit to the base; Ensure the connection is secure. A dim display might indicate low battery levels if applicable (check model specifications).
For persistent display problems, a factory reset may be necessary. Warning: this will erase all settings. CNET notes that smart thermostats, like the T4, occasionally require troubleshooting. If the issue continues after a reset, contact customer support for assistance and potential hardware evaluation.
Leave a Reply
You must be logged in to post a comment.